FIAT 124 (1968-74)
DESCRIPTION
Rear axle assembly is semi-floating, hypoid gear type with centerline of pinion set below centerline of ring gear. Axle shafts have integral wheel hubs and are supported in the differential case by side gears and in the axle housing by ball bearings. Service of these assemblies, with exception of axle housing, may be performed without removing complete rear axle assembly from vehicle
AXLE RATIO IDENTIFICATION
The semi-floating, hypoid gear type rear axle assembly with separate housing is used on all Fiat 124 models. The basic difference in rear axles from one vehicle model to another is the axle ratio. The Fiat 124 Sedan axle ratio is 4.3 to 1, and the Fiat 124 Sedan Special is 4.1 to 1.
REMOVAL AND INSTALLATION
Axle Shaft and Bearings
Removal - 1) Raise vehicle and remove rear wheels and disc brake front shield. Remove caliper support bracket mounting bolt and remove caliper (without disconnecting brake lines). Remove bolts attaching brake disc to axle shaft hub and remove brake dis and plate.
2) Remove snap ring securing bearing dust shield. Attach slide hammer and withdraw axle shaft assembly. Inspect axle shaft, bearing, dust shield and bearing retaining collar for wear or damage and replace as necessary.
Disassembly - Using suitable arbor press (A. 74108/1/2), press bearing retaining collar off axle shaft and discard collar. NOTE - Retaining collar must never be reused; replace with new collar. Remove ring, dust shield, and bearing. If axle shaft is scored or damaged, replace shaft.
Reassembly - 1) Install snap ring, dust shield, and bearing onto axle shaft held vertically on solid plate of arbor press (A. 74107/1). Insert new collar into suitable holder. (A. 74107/4), place in oven and place on axle shaft. Press axle into collar using 13,000 lbs (6000 kg) maximum pressure.
2) Place axle shaft assembly in tool A. 9560. Rotate axle by applying 58 to 61.5 ft. lbs. (8 to 8.5 mkg) of torque then check dial indicator reading at opposite end of axle shaft. Reading should remain at zero rotation of axle shaft.
3) Remove load from axle and recheck dial indicator to zero reading. This will insure that collar has not moved on axle shaft.
Reinstallation - Install new oil seal and "O" ring and complete installation by reversing removal procedure.
DIFFERENTIAL CARRIER
Removal - Drain fluid, raise vehicle, and remove wheels. Withdraw axle shafts for enough to disengage from side gears. Disconnect propeller shaft, support differential and remove attaching bolts. Remove differential assembly from axle housing.
Installation - Thoroughly clean oil residue from axle housing. Position new gasket in place and reverse removal procedure.


OVERHAUL
Disassembly - 1) With differential secured in suitable holding fixture, remove two bolts and spring washers from caps and remove lock plates. Remove bolts and spring washers securing case bearing caps, and remove caps, adjuster rings and roller bearing cups. Remove differential case from carrier.
2) Turn differential carrier upside down and lock bevel pinion shaft and remove sleeve. Remove pinion, thrust ring, rear roller bearing cone and collapsible spacer from inside housing. Remove oil seal, oil slinger, and front bearing cone from carrier.
3) Slide collapsible spacer off pinion, then draw off rear roller bearing. Thrust washer can then be removed from pinion. Using a suitable puller, remove differential case roller bearings. Remove screws holding ring gear to differential case then use drift to remove pinion gear from case. Remove pinion gears, side gears and thrust washers.
REASSEMBLY AND ADJUSTMENT
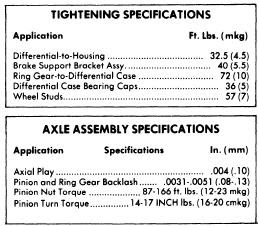
Case Assembly - 1) Install thrust washers on differential side gears and position gears in differential case. Insert pinion gears in case and engage them with side gears. Align holes in pinion gears through openings in case and insert pinion shaft. Check axial play in each side gear.
2) Axial play should not exceed .004" (0.10 mm). If play exceeds specification, replace side gear thrust washers. These washers are available in various thicknesses. If correct clearance cannot be obtained, gears must be replaced. Assemble ring gear to differential case and torque to specification. Using suitable driver (A. 70152), install both roller bearings on differential case.
Drive Pinion Depth - 1) Fit front and rear roller bearing cups of bevel pinion in position using suitable driver. Using same driver, attache cone of rear roller bearing to dummy pinion (A. 70184) then position in differential carrier.

2) Install cone on front roller bearing and place nut on dummy pinion. Turn pinion to seat bearing cones and tighten nut.
3) Zero dial indicator (A. 95690) on a surface plate then attach to dummy pinion. Position dial indicator to allow plunger to contact roller bearing seat in differential case. Obtain minimum reading on dial indicator by moving plunger from right to left. Record reading and repeat procedure on opposite side.
4) Determine an average from the two readings, then from this average, subtract the value stamped on bevel pinion to be used. This will give correct thickness of thrust washers to be inserted between the head of the pinion and the shoulder of rear roller bearing.
5) If the number stamped on the pinion is preceded by a plus sign, the thickness of the washer to be used is derived by subtracting this number from dial gauge reading. If the number stamped on the pinion is preceded by a minus sign, the thickness of the washer is obtained by adding this figure to the dial gauge reading.

6) Place thrust washer (correct thickness) on bevel pinion, then rear roller bearing cone followed by collapsible spacer. Install pinion assembly in carrier and attach the front roller bearing cone, oil slinger, oil seal and "U" joint sleeve. Install washer and self-locking nut on tail of pinion.
Pinion Bearing Preload - Secure pinion to keep it from turning. Gradually tighten nut on tail of pinion shat to B7-166 ft. lbs. (12-23 mkg). Check turning torque of pinion shaft using dynamometer (A. 95697) and adapter (A.55075) fitted to pinion nut and set to 17 INCH lbs. (20 cmkg). If turning torque is less than 14 INCH lbs. (16 mkg), pinion nut must be tightened (without exceeding maximum torque). If turning torque is more than 17 INCH lbs. (20 cmkg), pinion must be removed and collapsible spacer changed.
Backlash and Side Bearing Preload - 1)Place differential side bearing cups on side bearings and place differential assembly into carrier. Fit two bearing retaining and adjusting rings, install caps and torque to specifications.

2) Attach suitable tool (A. 95688) (see illustration), to differential carrier. Adjust backlash between ring gear and pinion to .0031-.0051" (0.08-0.13 mm). Insure that bearings are not preloaded.
3) Set preload by tightening two bearing adjusting rings alternately with equal number of turns until dial indicator "A" (see illustration), shows an increase of .0055-.0071" (0.14-0.18 mm). After preload is set, check backlash of bevel gears.
4) To check backlash, set dial indicator "B" (see illustration), so that plunger rests against tooth of bevel gear. Rotate ring gear to obtain maximum reading. Backlash must be .031-.0051" (0.08-0.13 mm).
Final Inspection and Assembly - With pinion bearing and ring gear backlash properly adjusted, make a tooth pattern contact check. NOTE - Check gear tooth contact using point impression mothod described at beginning of this section. When pattern is satisfactory, install axle shafts, brake drums, wheels and tires, propeller shaft and refill with suitable gear lubricant.


0 comments:
Post a Comment